A common piece of feedback from folks exploring the move from Win32/NET to UWP is about the lack of Systray (aka notification area) support in UWP. It is true that UWP code can’t run in the Systray, however a UWP package can contain a Win32/NET component that can put itself into the Systray. The UWP package will still be universal (run on Surface Hub, Windows Phone, etc.), and light up the PC-specific Systray functionality on the desktop edition only. In this post I will explain how this can be accomplished on Windows 10.
TL;DR
See source code on GitHub and install the demo app from the Windows Store:

Details
First step is adding a WinForms project to your UWP solution. It can be done in C++/Win32 as well, but personally I find WinForms to be the most convenient framework for legacy Systray component development. Next add a class file (in my case called ‘SystrayApplicationContext.cs’) to implement all your systray functionality.

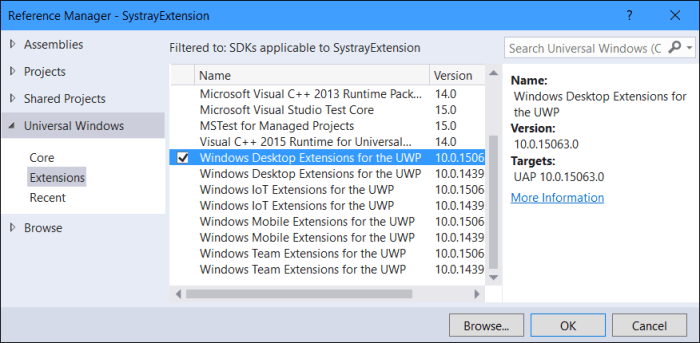
To connect the UWP app and the WinForms systray component, we will be using the following two UWP platform features on Windows 10: FullTrustProcessLauncher and AppService. For the former we need to add a reference to the Windows 10 Desktop Extensions SDK:
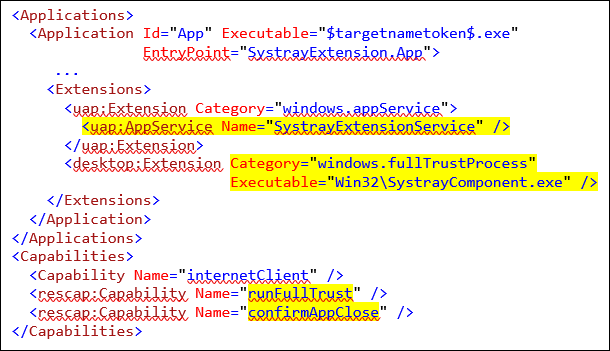
Now we can declare the “windows.fullTrustProcess” and “windows.AppService” extensions in the manifest for our UWP app package. Note also the two capability declarations. The first one is needed for launching the WinForms code from the UWP, the second one we will need in order to intercept the CloseRequested event (when the user hits the “X” on the window). The latter is somewhat unrelated to the topic of this post, but it’s an implementation choice I made for the sample app – and might be useful for your similar scenarios. Note that this API is available in the Creators Update in preview state.
With the project structure and manifest declarations in place, we can start implementing the desired functionality. First, we want to intercept the user’s close gesture by subscribing to the CloseRequested event:
SystemNavigationManagerPreview mgr =
 SystemNavigationManagerPreview.GetForCurrentView();
mgr.CloseRequested += SystemNavigationManager_CloseRequested;
When the event got triggered we let the user decide if/how they want to close the app. If they chose “Close to Systray” we will launch our WinForms component that will continue to run our code in the notification area. Note that I am only making this call on systems that support the FullTrustAppContract. This way my app will still be universal and work correctly on all editions of Windows 10, such as Surface Hub or Windows Phone:
case CloseAction.Systray:
 if (ApiInformation.IsApiContractPresent(
  "Windows.ApplicationModel.FullTrustAppContract", 1, 0))
 {
 await FullTrustProcessLauncher.LaunchFullTrustProcessForCurrentAppAsync();
 }
Now switching over to the WinForms component. All the relevant code lives in SystrayApplicationContext.cs. I am implementing basic functionality here in the context menu to demonstrate a couple of common concepts:
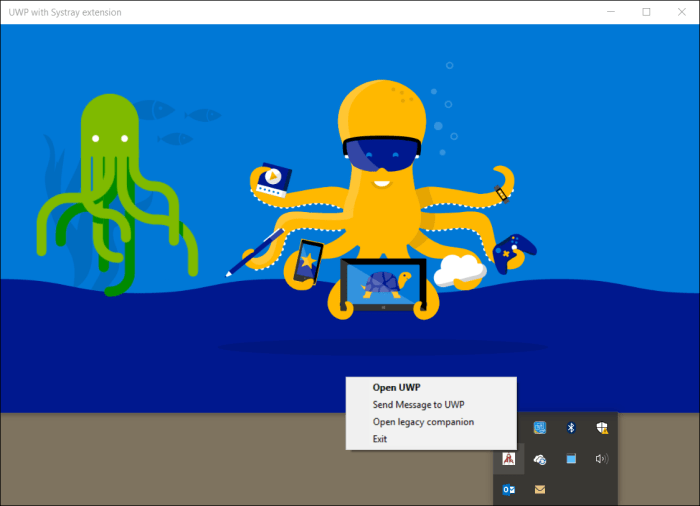
- “Open UWP” – restores the UWP app back to the foreground
- “Send message to UWP” – sends a message via AppService, the UWP will display it as toast (if in background) or dialog (if in foreground)
- “Open legacy companion” – displays a WinForms UI that is implemented in the same component, included in our UWP package
- “Exit” – exits both the WinForms and UWP processes
Here is how we hook up the menu handlers. Explore the full source code on GitHub for details on each of the menu actions.
public SystrayApplicationContext()
{
 MenuItem openMenuItem =
 new MenuItem("Open UWP", new EventHandler(OpenApp));
 MenuItem sendMenuItem =
 new MenuItem("Send message to UWP", new EventHandler(SendToUWP));
 MenuItem legacyMenuItem =
 new MenuItem("Open legacy companion", new EventHandler(OpenLegacy));
 MenuItem exitMenuItem = new MenuItem("Exit", new EventHandler(Exit));
 openMenuItem.DefaultItem = true;

 notifyIcon = new NotifyIcon();
 notifyIcon.DoubleClick += new EventHandler(OpenApp);
 notifyIcon.Icon = SystrayComponent.Properties.Resources.Icon1;
 notifyIcon.ContextMenu = new ContextMenu(new MenuItem[]
   { openMenuItem, sendMenuItem, legacyMenuItem, exitMenuItem });
 notifyIcon.Visible = true;
}
Two of the actions I want to highlight real quick, as they are using UWP features, called from the WinForms component, which may be a bit of a new concept for some readers. To get access to those APIs (AppListEntry and AppServiceConnection) I just need to add a reference to the Windows.winmd in my WinForms project. Then I can make these calls:
private async void OpenApp(object sender, EventArgs e)
{
 IEnumerable<AppListEntry> appListEntries = await Package.Current.GetAppListEntriesAsync();
 await appListEntries.First().LaunchAsync();
}

private async Task SendToUWP(ValueSet message)
{
 if (connection == null)
 {
  connection = new AppServiceConnection();
  connection.PackageFamilyName = Package.Current.Id.FamilyName;
  connection.AppServiceName = "SystrayExtensionService";
  connection.ServiceClosed += Connection_ServiceClosed;
  AppServiceConnectionStatus connectionStatus = await connection.OpenAsync();
 }
 await connection.SendMessageAsync(message);
}
Hope this information was useful for some of you and will help you when you make the jump from Win32/NET to UWP on Windows 10. Please leave your questions and comments here and I will respond as soon as I can.


