Following up on what we talked about at BUILD, here is another scenario that is common for LOB Enterprise desktop app developers: Using Microsoft.Office.Interop.* APIs to automate tasks in Office apps installed on the desktop. I have put together a small sample that shows how this can be done from a UWP app on Windows 10 Anniversary Update and above. Hope this will be useful for folks who have existing code and skills in this space and want to move on to UWP.
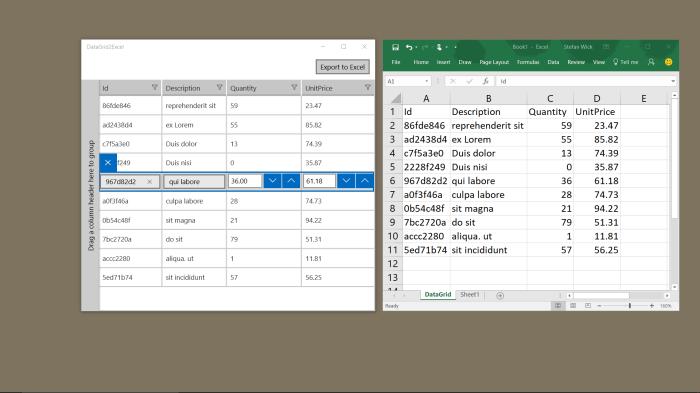
What does the sample do? The task is to automate Excel with the interop APIs in order to populate a spreadsheet with the content of a Telerik data grid control in my UWP. This is a fairly simple example, but you get the idea how you can now utilize those APIs for Office automation from your UWP app package.
How does it work? The UWP is using the FullTrustProcessLauncher API from the Desktop extension SDK to activate a .NET component from its package that is making the calls to the Microsoft.Office.Interop.* APIs. We are using an AppService to communicate between the two parts of the app package.
Even though we are using a desktop-only API here, the UWP app can still be universal and run on all Windows 10 devices like Windows Phone, Surface Hub, Xbox, etc. – and light up the Office automation functionality on PC only.
TL;DR
See source code on GitHub and/or get the demo app from the Store:

Details
First thing we need to do is extend our UWP app package with two extensions: (a) ‘windows.fullTrustProcess’ implemented in my Excel.Interop.exe and (b) ‘windows.appService’, which I will be running in-proc with my UWP – so no need to define an entry point for this one.
<Extensions>
  <uap:Extension Category="windows.appService">
    <uap:AppService Name="ExcelInteropService" />
  </uap:Extension>
  <desktop:Extension Category="windows.fullTrustProcess"
                     Executable="Win32\Excel.Interop.exe" />
</Extensions>
The Excel.Interop.exe component now simply connects to our AppService and waits for requests. When the service gets closed, the component will exit.
static void Main(string[] args)
{
    // connect to app service and wait until the connection gets closed
    appServiceExit = new AutoResetEvent(false);
    InitializeAppServiceConnection();
    appServiceExit.WaitOne();
}

static async void InitializeAppServiceConnection()
{
    connection = new AppServiceConnection();
    connection.AppServiceName = "ExcelInteropService";
    connection.PackageFamilyName = Package.Current.Id.FamilyName;
    connection.RequestReceived += Connection_RequestReceived;
    connection.ServiceClosed += Connection_ServiceClosed;

    AppServiceConnectionStatus status = await connection.OpenAsync();
}
When a request comes in from the UWP app, we’ll handle it and do as we are told by calling the Microsoft.Office.Interop.* APIs.
private async static void Connection_RequestReceived(
   AppServiceConnection sender,
   AppServiceRequestReceivedEventArgs args)
{
    string value = args.Request.Message["REQUEST"] as string;
    string result = "";
    switch (value)
    {
        case "CreateSpreadsheet":
            try
            {
                // call Office Interop APIs to create the Excel spreadsheet
                Excel.Application excel = new Excel.Application();
                excel.Visible = true;
                Excel.Workbook wb = excel.Workbooks.Add();
                Excel.Worksheet sh = wb.Sheets.Add();
                sh.Name = "DataGrid";
                sh.Cells[1, "A"].Value2 = "Id";
                sh.Cells[1, "B"].Value2 = "Description";
                sh.Cells[1, "C"].Value2 = "Quantity";
                sh.Cells[1, "D"].Value2 = "UnitPrice";

                for (int i = 0; i < args.Request.Message.Values.Count / 4; i++)
                {
                    CreateLineItem(sh, i, args.Request.Message);
                }
                result = "SUCCESS";
            }
            catch (Exception exc)
            {
                result = exc.Message;
            }
            break;
        default:
            result = "unknown request";
            break;
    }

    ValueSet response = new ValueSet();
    response.Add("RESPONSE", result);
    await args.Request.SendResponseAsync(response);
}
How does the code look on the UWP client side? Very simple – once the connection is established, we can send down the content of our table (as a ValueSet) to the Excel.Interop component via the AppService connection.
private async void MainPage_AppServiceConnected(object sender, EventArgs e)
{
    // send the ValueSet to the fulltrust process
    AppServiceResponse response =
        await App.Connection.SendMessageAsync(table);

    // check the result
    object result;
    response.Message.TryGetValue("RESPONSE", out result);
    if (result.ToString() != "SUCCESS")
    {
        MessageDialog dialog = new MessageDialog(result.ToString());
        await dialog.ShowAsync();
    }
}
Thanks for reading this far. Hope this was helpful and you can use it to build great solutions with UWP. Questions, feedback, concerns or cheers? Please leave them in the comments or hit me up on twitter @StefanWickDev.