
If you haven’t read part 1 of this series yet, please start there first. I have covered the “hello world” version of a packaged app that requires elevation at launch time. In this post I want to show how a packaged app can dynamically elevate itself after it has been launched normally.
TL;DR
I already have the 1809 update and the Windows SDK 17763 (or later) installed. Just show me the code on GitHub …
Sample Code Repo on Github
Step-by-Step Tutorial
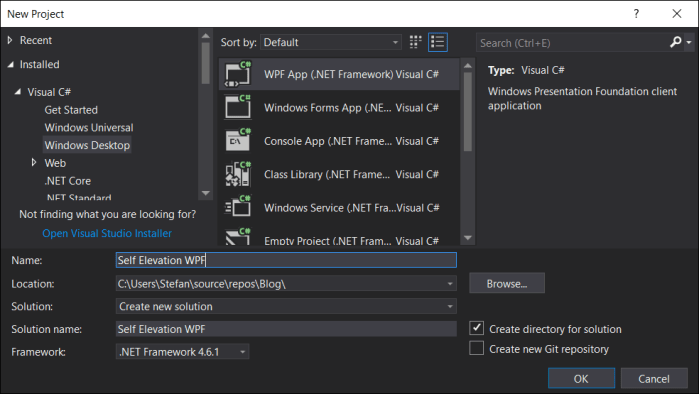
1. Create a new desktop application
Make sure you run Windows 10 with the 1809 update and have the Windows SDK 17763 (or later) installed. Now create a new C# WPF desktop application in Visual Studio 2017 (can be any type of desktop application really):
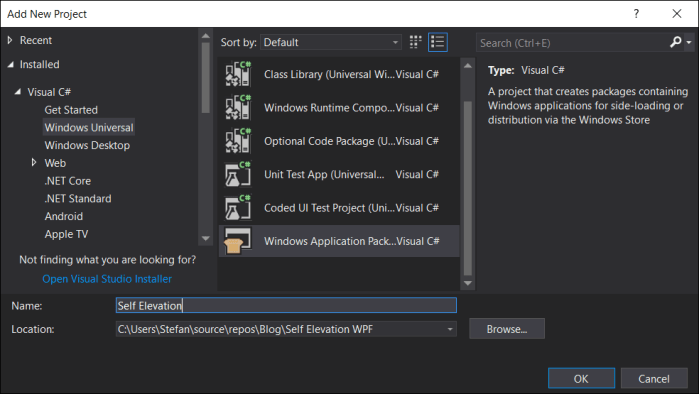
2. Convert to a packaged app
Add a Windows Packaging Project to the solution and call it “Self Elevation”:
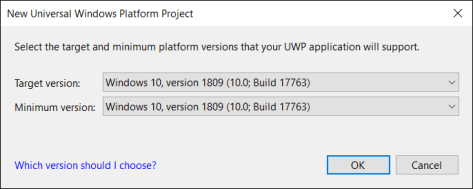
Be sure to set both “Minimum” and “Target” version to 17763 or higher as build number 17763 maps to the 1809 update for Windows 10:
Reference your WPF application from the packaging project by right-clicking on the “Application” node under the “Package” project and selecting “Add Reference …” :

Now set the “Self Elevation” package project as your startup project in the solutions settings per below screenshot, and then hit F5 to see your empty packaged WPF app running.

3. Add code to elevate dynamically
In contrast to the previous example, we are not adding an application manifest to require elevation. We want the application to run at normal user privileges by default, and only request elevation dynamically when it is indeed needed.
To demonstrate this, let’s add a button to the XAML user interface in MainPage.xaml:
<Grid>
    <Button Content="Elevate Me!"
            HorizontalAlignment="Center"
            VerticalAlignment="Center"
            FontSize="48"
            Click="Button_Click"/>
</Grid>
And add the following code-behind in MainPage.xaml.cs, to re-launch the app with elevated privileges:
private void Button_Click(object sender, RoutedEventArgs e)
{
  string aliasPath =
    Environment.GetFolderPath(Environment.SpecialFolder.LocalApplicationData) +
    @"\microsoft\windowsapps\SelfElevationWPF.exe";

  ProcessStartInfo info = new ProcessStartInfo();
  info.Verb = "runas";
  info.UseShellExecute = true;
  info.FileName = aliasPath;
  Process.Start(info);

  App.Current.Shutdown();
}
To re-launch as admin we need to call Process.Start (or CreateProcess), but packaged apps can’t just be launched via these APIs. Luckily, packaged apps have the concept of AppExecutionAlias, which is a 0-byte EXE that facilitates the packaged app launch for classic invokers – such as CMD or Process.Start.
The first line is about getting the full path to this 0-byte AppExecutionAlias EXE file for our WPF app. Then we are creating the parameters for the Process.Start call. Key piece here is the “runas” verb, that will trigger the request for elevation for the relaunched app.
Finally, once we have relaunched ourselves as elevated, we can shutdown our current instance.
4. Declare the AppExecutionAlias
Packaged apps don’t have an AppExecutionAlias by default – the developer needs to be explicit about supporting this additional launch contract in the appx manifest. So let’s add this extension to our Package.appxmanifest file inside the <Application> node.
<Package
  ...
  xmlns:uap3="http://schemas.microsoft.com/appx/manifest/uap/windows10/3"
  xmlns:desktop="http://schemas.microsoft.com/appx/manifest/desktop/windows10"
  IgnorableNamespaces="uap3 desktop ...">
  ...

  <Extensions>
    <uap3:Extension Category="windows.appExecutionAlias"
                    Executable="Self Elevation WPF\Self Elevation WPF.exe"
                    EntryPoint="Windows.FullTrustApplication">
      <uap3:AppExecutionAlias>
        <desktop:ExecutionAlias Alias="SelfElevationWPF.exe" />
      </uap3:AppExecutionAlias>
    </uap3:Extension>
  </Extensions>
  ...
</Package>
Now we are almost done – last thing to add to our appx manifest is the same “AllowElevation” capability that we have already used in the previous post:
  <Capabilities>
    <Capability Name="internetClient" />
    <rescap:Capability Name="runFullTrust" />
    <rescap:Capability Name="allowElevation" />
  </Capabilities>
That’s it. Now we can test via F5 or by deploying the app package on our test machine. Use TaskManager to observe how the “Elevation” status changes from ‘false’ to ‘true’ after clicking the button and accepting the elevation request.

In the next post in this series I will cover how to trigger elevated code execution from a pure UWP process running in the app container by combining the concepts of the “fullTrustProcess” desktop extension, the “allowElevation” capability and the “appExecutionAlias” extension.
