If you haven’t read part 1 and part 2 of this series yet, please start there first. I have covered the “hello world” version of a packaged app that requires elevation at launch time and showed how a packaged app can dynamically elevate itself. In this post we’ll get to the fun part: using the ‘allowElevation’ capability from a UWP app to execute code with elevated privileges on Windows 10 desktop with the 1809 update.
TL;DR
I already have the 1809 update and the Windows SDK 17763 (or later) installed. Just show me the code on GitHub …
Step-by-Step Tutorial
1. Create a new Universal Windows App
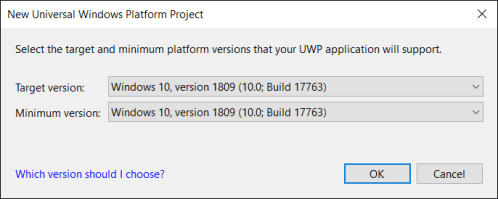
Make sure you run Windows 10 with the 1809 update and have the Windows SDK 17763 (or later) installed. Now create a new C# Universal Windows application in Visual Studio 2017 (can use any supported programming language as well, e.g. C++, JS, …):
Be sure to set both “Minimum” and “Target” version to 17763 or higher as build number 17763 maps to the 1809 update for Windows 10. The ‘allowElevation’ capability we will be using has been introduced in 1809 and is not available in earlier versions of Windows 10.

Now we need to add a ‘fullTrustProcess’ desktop extension to our UWP that will contain the code we want to run with elevated privileges. For a complete tutorial on UWP desktop extension read up here on all the details. In this post I will quickly move through the steps of setting up the desktop extension for our new UWP app:
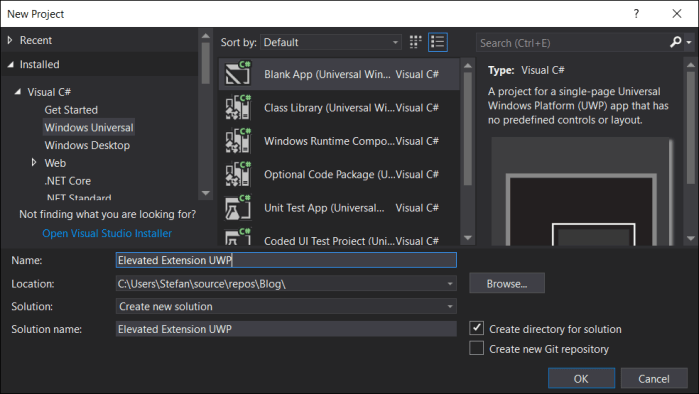
2. Add the desktop extension project
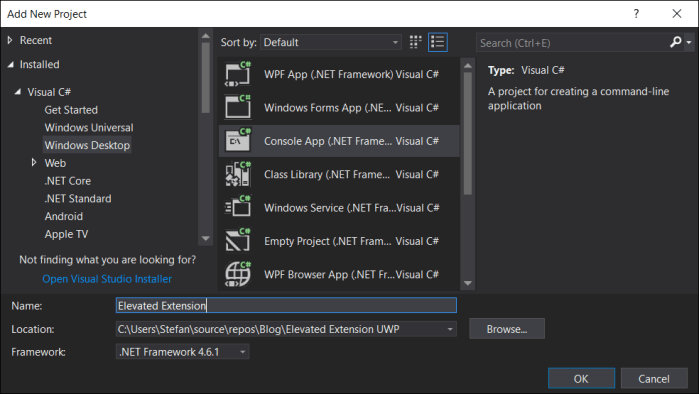
For this example we want the desktop extension process to be headless (i.e. a background process without UI). It can have a UI as well if that’s what you need for your scenario. So let’s add a C# desktop console application (of course this could be C++, VB, etc. as well) and call it “Elevated Extension”:
 We don’t want a console box to pop up for our elevated background process, so we need to configure this project to run headless. For that go into the project settings and change the Output Type from “Console Application” to “Windows Application” (I know, not very intuitive …)

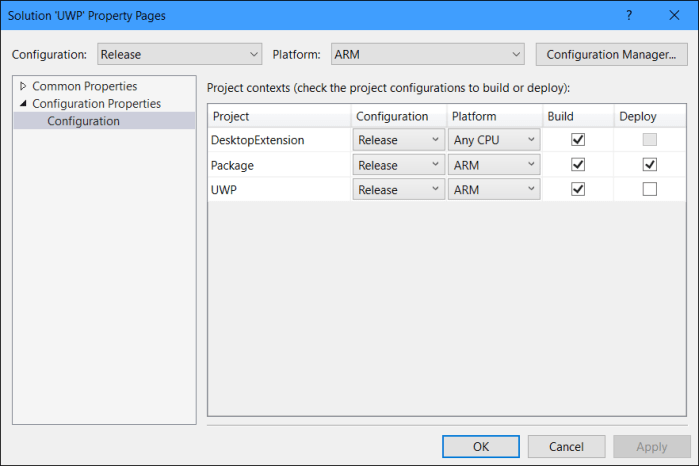
5. Packaging everything together
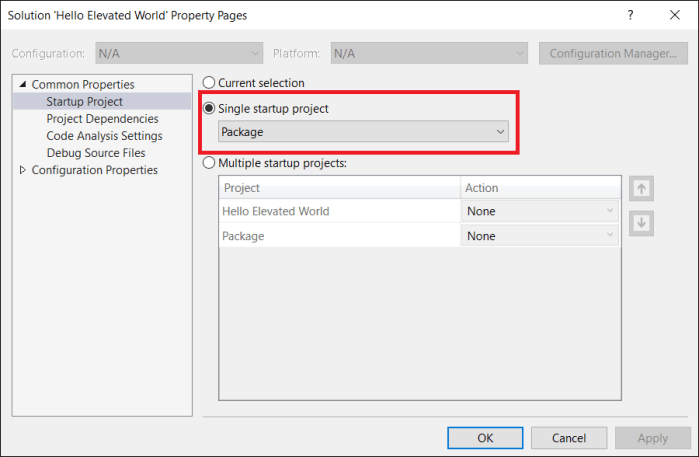
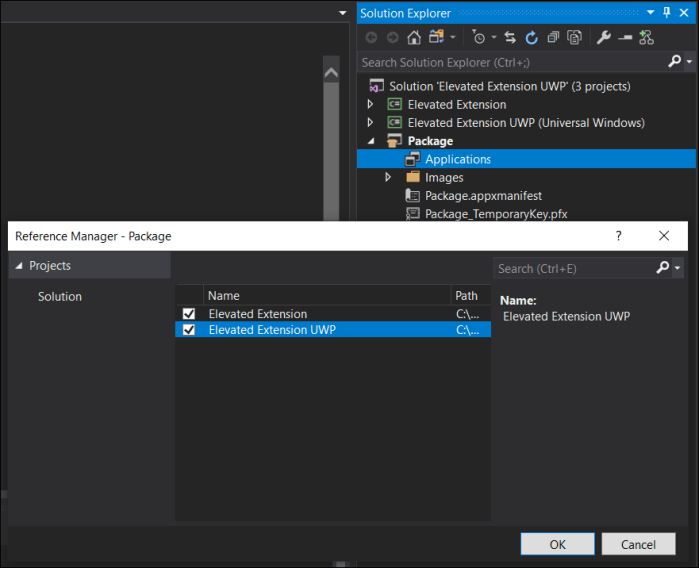
Next we need to add a “Windows Application Packaging Project” (look for it in the “Windows Universal” category). Name it “Package” and make it the startup project, so your solution setup looks like in the screenshot below. In order to package both the UWP and the desktop code in one app package, add both as Application references to the Packaging project:
6. Configuring the appx manifest
Now to connect the two projects we need to declare the “fullTrustProcess” desktop extension in the package manifest. For this open the Package.appxmanifest file in the Packaging project (“Package”) in XML editing mode and add the extension within the <Application> node. While we are in this file we are also adding the “appExecutionAlias” extension that we learned about in part 2, as we will need it to launch our extension with elevated privileges. Last but not least, you will also need to add namespace definitions for “uap3” and “desktop” in the root <Package> element per below snippet.
<Package
  ...
  xmlns:uap3="http://schemas.microsoft.com/appx/manifest/uap/windows10/3"
  xmlns:desktop="http://schemas.microsoft.com/appx/manifest/desktop/windows10"
  IgnorableNamespaces="uap3 desktop ...">
  ...

  <Extensions>

    <desktop:Extension Category="windows.fullTrustProcess"
                       Executable="Elevated Extension\Elevated Extension.exe">
      <desktop:FullTrustProcess>
        <desktop:ParameterGroup GroupId="User" Parameters="/user" />
        <desktop:ParameterGroup GroupId="Admin" Parameters="/admin" />
      </desktop:FullTrustProcess>
    </desktop:Extension>

    <uap3:Extension Category="windows.appExecutionAlias"
                    Executable="Elevated Extension\Elevated Extension.exe"
                    EntryPoint="Windows.FullTrustApplication">
      <uap3:AppExecutionAlias>
        <desktop:ExecutionAlias Alias="ElevatedExtension.exe" />
      </uap3:AppExecutionAlias>
    </uap3:Extension>

  </Extensions>
  ...
</Package>
Note that the the two parameter groups I am defining for the desktop extension are not mandatory. I am doing it here only for this sample to later demonstrate how we can launch the extension with either user privileges or admin privileges.
7. Adding the launcher code
Now that solution and manifest are set up and configured correctly, we are ready to add the code to launch the extension from the UWP – as either elevated or regular process. First lets add some XAML to MainPage.xaml:
<StackPanel HorizontalAlignment="Center" VerticalAlignment="Center">
    <Button Content="Run Backgroundprocess as User"
            Click="ButtonUser_Click"
            HorizontalAlignment="Stretch"
            FontSize="32" Margin="3"/>
    <Button Content="Run Backgroundprocess as Admin"
            Click="ButtonAdmin_Click"
            HorizontalAlignment="Stretch"
            FontSize="32" Margin="3"/>
</StackPanel>
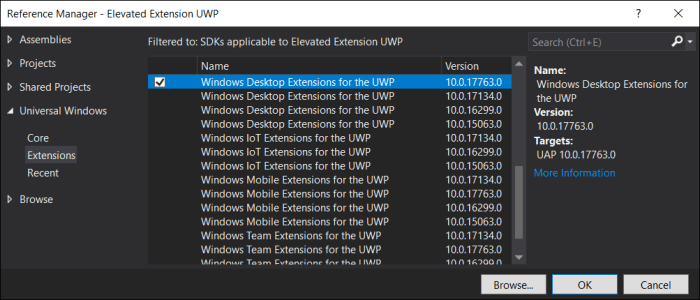
Before we can add the code-behind for the button click handlers, we need to add a reference to the UWP desktop extension SDK, because that’s where the FullTrustProcessLauncher API is defined. This API, btw, is not new in the 1809 update. It has been around since the Creators Update (SDK build 14393), but it’s recommended you reference the Desktop extension SDK that matches your target version, i.e. 17763 in our case.
Next we add the two button click handlers in MainPage.xaml.cs. The key piece is the FullTrustProcessLauncher API. We are passing in the parametergroup to indicate to the extension whether we need to run it as user or with admin privileges. The processing of this parameter is application logic as we will see in the next step. Wrapping this call into an “IsApiContractPresent” is an important practice to ensure our universal app can run without crashing also on non-desktop devices that don’t support the FullTrustProcessLauncher API:
private async void ButtonUser_Click(object sender, RoutedEventArgs e)
{
  if (ApiInformation.IsApiContractPresent(
      "Windows.ApplicationModel.FullTrustAppContract", 1, 0))
  {
    await
      FullTrustProcessLauncher.LaunchFullTrustProcessForCurrentAppAsync("User");
  }
}

private async void ButtonAdmin_Click(object sender, RoutedEventArgs e)
{
  if (ApiInformation.IsApiContractPresent(
      "Windows.ApplicationModel.FullTrustAppContract", 1, 0))
  {
    await
      FullTrustProcessLauncher.LaunchFullTrustProcessForCurrentAppAsync("Admin");
  }
}
The final piece of code we need to add now goes into Program.cs of the “Elevated Extension” project. This is the code that handles the “/user” vs “/admin” parameter. If the latter has been specified we want to do the same as in part 2, i.e. relaunch the process as admin using the AppExecutionAlias. In case you are wondering why the strings we are handling here are different from the strings being passed to the launch API (“/user vs “User”), take a look at the ParameterGroup entries we added to the manifest. It maps a friendly name (“User”) to what could be in some case a fairly convoluted long string of parameters (“/user” in our case).
static void Main(string[] args)
{
    if (args.Length > 2)
    {
        if (args[2] == "/admin")
        {
          string aliasPath =
      Environment.GetFolderPath(Environment.SpecialFolder.LocalApplicationData) +
      @"\microsoft\windowsapps\ElevatedExtension.exe";

          ProcessStartInfo info = new ProcessStartInfo();
          info.Verb = "runas";
          info.UseShellExecute = true;
          info.FileName = aliasPath ;
          Process.Start(info);
          return;
        }
    }

    AutoResetEvent areWeDone = new AutoResetEvent(false);
    // do some task, then exit
    areWeDone.WaitOne(10000);
}
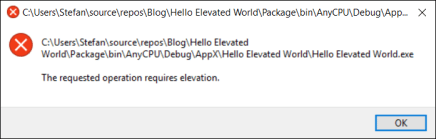
8. Run and test the solution
Now we are ready to run and test our solution, before hitting F5 make sure the “Package” project is set as startup project and you have added the “allowElevation” capability in its appx manifest:
  <Capabilities>
    <Capability Name="internetClient" />
    <rescap:Capability Name="runFullTrust" />
    <rescap:Capability Name="allowElevation" />
  </Capabilities>
When the UWP is up-and-running use the buttons to launch the extension either as user or as admin. Observe the result in TaskManager, remember that the extension has been coded to exit itself after 10sec in this example:

This concludes my 3-part tutorial about the new ‘allowElevation’ capability. Please leave your feedback and questions as comments and I will do my best to address them in a timely fashion.

 Open the app.manifest file and change the requested execution level from “asInvoker” to “highestAvailable”: