If you haven’t read part 1 or part 2 of this series yet, please start there first. I have covered the “Hello World” version of a UWP with Desktop extension and explained how to launch different process types and pass in arguments. Now the next set of questions I want to answer in this post are:
- How to establish a communication channel between the components?
- How to send requests and receive responses from either side?
- How to handle process exit scenarios?
TL; DR;
Short answers: An AppServiceConnection can be used to connect between the components and to allow bi-directional communication via ValueSets. Typically you want to host the AppService in-proc with your UWP app in this type of scenario.
Just show me the code on github …
https://github.com/StefanWickDev/UWP-FullTrust/tree/master/UWP_FullTrust_3
Let me run your sample from the Microsoft Store …
https://www.microsoft.com/store/apps/9NR0G35Q2F65
Declaring the AppService
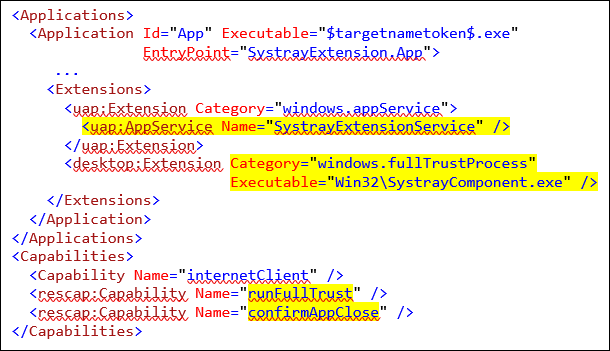
The first step is to declare the AppService extension in our manifest, which is what will provide us with a two-way communication pipe between our components:
<Extensions>
 <uap:Extension Category="windows.appService">
  <uap:AppService Name="SampleInteropService" />
 </uap:Extension>
 <desktop:Extension Category="windows.fullTrustProcess" Executable="FullTrust\FullTrust.exe" />
</Extensions>
For full details on AppServices in the Universal Windows Platform our developer documentation has this good read: https://docs.microsoft.com/en-us/windows/uwp/launch-resume/how-to-create-and-consume-an-app-service
Establishing the Connection
Now in order to establish the connection, let’s take a look at our WPF app. One of the first things it does during launch is to establish the connection to the AppService, and then retain the instance of the AppServiceConnection for the lifetime of the connection. We are also hooking up the event handlers here to receive requests and to get notified when the connection gets closed:
// MainWindow.xaml.cs in WPF project
private async void InitializeAppServiceConnection()
{
 connection = new AppServiceConnection();
 connection.AppServiceName = "SampleInteropService";
 connection.PackageFamilyName = Package.Current.Id.FamilyName;
 connection.RequestReceived += Connection_RequestReceived;
 connection.ServiceClosed += Connection_ServiceClosed;

 AppServiceConnectionStatus status = await connection.OpenAsync();
 if (status != AppServiceConnectionStatus.Success)
 {
  // something went wrong ...
  MessageBox.Show(status.ToString());
  this.IsEnabled = false;
 }
}
On the other side in the UWP, this will now trigger the OnBackgroundActivated event, and we’ll grab a reference to the AppServiceConnection instance there as well and hold on to it.
In our case the UWP is already running in the foreground, but note that it doesn’t have to: Client processes can also connect to the AppService if the foreground app is not running. It would activate the UWP in the background and establish the AppServiceConnection. The UWP process would then continue running in the background for as long as the connection is active.
// App.xaml.cs in UWP project
protected override void OnBackgroundActivated(BackgroundActivatedEventArgs args)
{
 base.OnBackgroundActivated(args);

 if (args.TaskInstance.TriggerDetails is AppServiceTriggerDetails details)
 {
  // only accept connections from callers in the same package
  if (details.CallerPackageFamilyName == Package.Current.Id.FamilyName)
  {
   // connection established from the fulltrust process
   AppServiceDeferral = args.TaskInstance.GetDeferral();
   args.TaskInstance.Canceled += OnTaskCanceled;

   Connection = details.AppServiceConnection;
   AppServiceConnected?.Invoke(this, args.TaskInstance.TriggerDetails as AppServiceTriggerDetails);
  }
 }
}
Sending Requests and Responses
Now that the connection has been established and either side keeps a reference to the AppServiceConnection instances, we can send requests from either side, and respond to them accordingly.
Scenario 1 – UWP sends request to desktop extension
UWP apps don’t have access to the registry. Let’s assume for an LOB enterprise scenario I need to read a certain reg key. The UWP can use a desktop extension to get the job done, by sending an AppServiceRequest that contains the requested key. The desktop extension can then query the registry and send the name/value pairs back to the UWP as an AppServiceResponse.
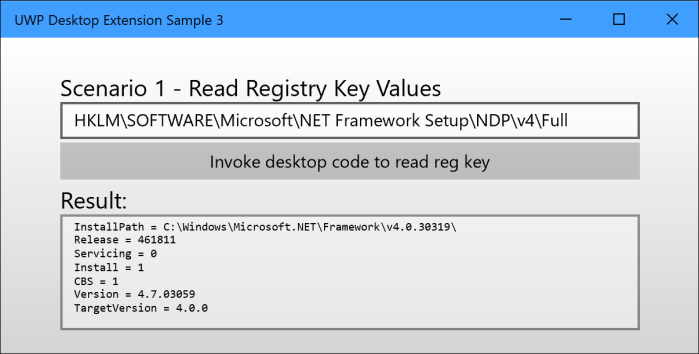
// MainPage.Xaml.cs in UWP project
private async void btnClick_ReadKey(object sender, RoutedEventArgs e)
{
 ValueSet request = new ValueSet();
 request.Add("KEY", tbKey.Text);
 AppServiceResponse response = await App.Connection.SendMessageAsync(request);

// display the response key/value pairs
 tbResult.Text = "";
 foreach (string key in response.Message.Keys)
 {
 tbResult.Text += key + " = " + response.Message[key] + "\r\n";
 }
}
This triggers the registry reading code in the WPF app. The implementation can be found here on github in the ‘Connection_RequestReceived’ event handler. In a real production scenario you wouldn’t implement this extension as a windowed WPF app of course, but instead use a headless background process. But since we need UI for scenario #2, I went with WPF …
Scenario 2 – Desktop extension sends request to UWP
To show the reverse communication flow I am just picking a dummy scenario: I will send two double values from WPF to UWP and let the UWP app respond with the sum of both:
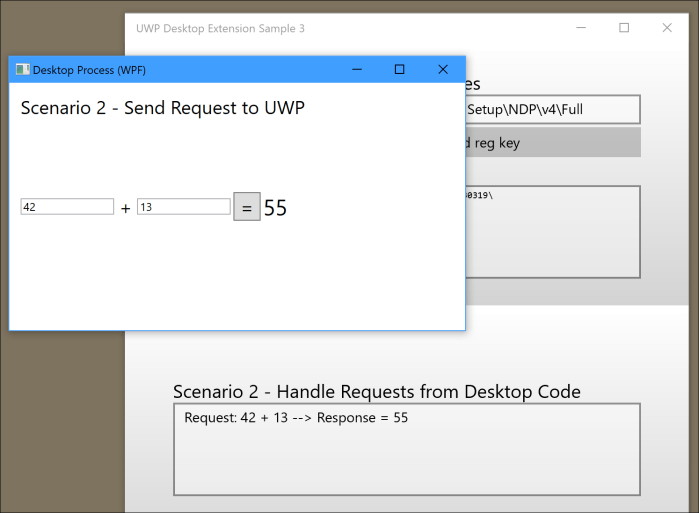
// MainWindow.xaml.cs in WPF project
private async void Button_Click(object sender, RoutedEventArgs e)
{
 // ask the UWP to calculate d1 + d2
 ValueSet request = new ValueSet();
 request.Add("D1", d1);
 request.Add("D2", d2);
 AppServiceResponse response = await connection.SendMessageAsync(request);
 double result = (double)response.Message["RESULT"];
 tbResult.Text = result.ToString();
}
// in MainPage.Xaml.cs in UWP project
private async void AppServiceConnection_RequestReceived(AppServiceConnection sender, AppServiceRequestReceivedEventArgs args)
{
 double d1 = (double)args.Request.Message["D1"];
 double d2 = (double)args.Request.Message["D2"];
 double result = d1 + d2;

 ValueSet response = new ValueSet();
 response.Add("RESULT", result);
 await args.Request.SendResponseAsync(response);

// log the request in the UI for demo purposes
 await this.Dispatcher.RunAsync(CoreDispatcherPriority.Normal, () =>
 {
 tbRequests.Text += string.Format("Request: {0} + {1} --> Response = {2}\r\n", d1, d2, result);
 });
}
Handling Process Exit Scenarios
Now what happens if one side of the communication pipeline goes away, for whatever reason? It’s up to the app to handle this and decide what should happen. Generally speaking there are three options: try to relaunch the companion component, or keep going without the companion (if it’s non-essential), or failfast to terminate yourself. For our demo I will implement two scenarios:
Scenario 1 – UWP will relaunch closed WPF
// MainPage.xaml.cs in UWP project
private async void MainPage_AppServiceDisconnected(object sender, EventArgs e)
{
 await Dispatcher.RunAsync(CoreDispatcherPriority.Normal, ()=>
 {
  // disable UI to access the connection
  btnRegKey.IsEnabled = false;

  // ask user if they want to reconnect
  Reconnect();
 });
}

private async void Reconnect()
{
 if (App.IsForeground)
 {
  MessageDialog dlg = new MessageDialog("Connection to desktop process lost. Reconnect?");
  UICommand yesCommand = new UICommand("Yes", async (r) =>
  {
   await FullTrustProcessLauncher.LaunchFullTrustProcessForCurrentAppAsync();
  });
  dlg.Commands.Add(yesCommand);
  UICommand noCommand = new UICommand("No", (r) => { });
  dlg.Commands.Add(noCommand);
  await dlg.ShowAsync();
 }
}
Scenario 2 – WPF will terminate itself when UWP closes
// MainWindow.xaml.cs in WPF project
private void Connection_ServiceClosed(AppServiceConnection sender, AppServiceClosedEventArgs args)
{
 // connection to the UWP lost, so we shut down the desktop process
 Dispatcher.BeginInvoke(DispatcherPriority.Normal, new Action(() =>
 {
  Application.Current.Shutdown();
 }));
}
This is it for part 3 of this series. Hopefully I answered most of the question around communication between the app and its extension in this sample. If not, please leave comments here, hit me up on Twitter or post your questions on Stackoverflow. If they are tagged with ‘UWP’ they will show on my radar.